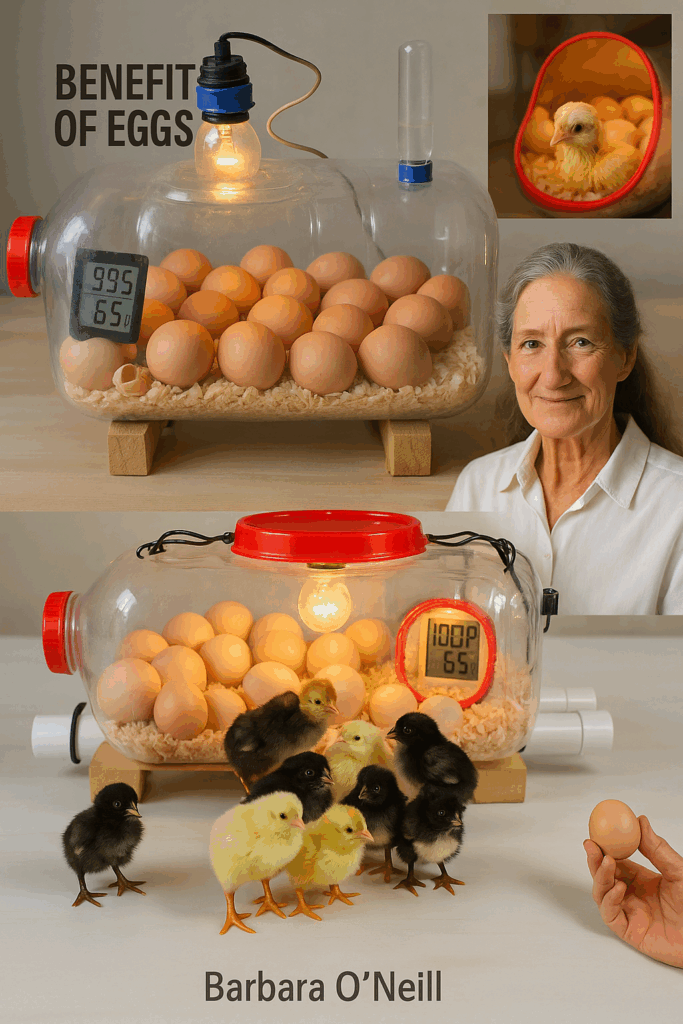
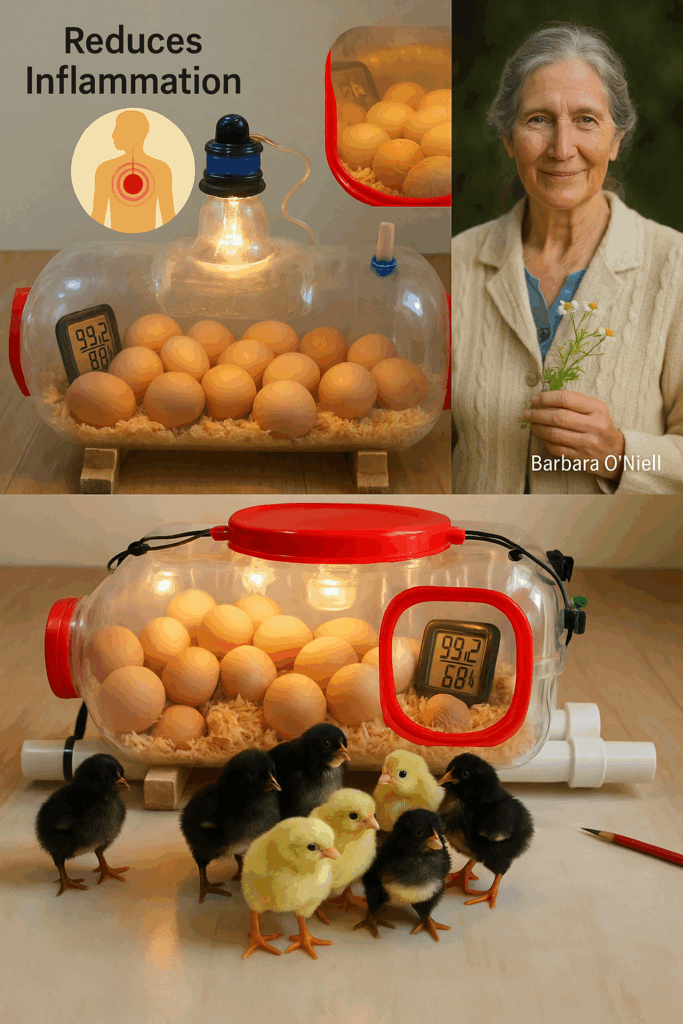
Hatching eggs at home can be a magical experience—but professional incubators can be expensive. Luckily, with a little creativity, you can make your own budget-friendly egg incubator using something as simple as a 5-liter water bottle.
This DIY guide will walk you through every step to help you create a functional, low-cost incubator and start your hatching journey.
🧰 Materials You’ll Need
- A 5-liter (or larger) plastic water bottle
- A small light bulb (15–25W) or a miniature heat lamp
- Thermometer and hygrometer (for monitoring temp & humidity)
- Egg carton or foam base for holding eggs
- Scissors or a sharp knife (for cutting the bottle)
- Drill or needle (for making air holes)
- Aluminum foil or black tape (optional for insulation)
- Sponge or small dish of water (to increase humidity)
🛠️ Step-by-Step Instructions
1. Prepare the Bottle
- Thoroughly wash and dry the bottle.
- Lay it on its side.
- Cut a large rectangle into the side of the bottle (but leave one edge attached to act as a door or flap).
- Tape the flap down when not in use to help retain heat.
2. Install the Heat Source
- Create a hole on the opposite side or top of the bottle for inserting your bulb or lamp.
- Use a low-wattage bulb (15–25W) to gently warm the air inside.
- Make sure the bulb is securely installed, and it doesn’t touch the plastic.
- Add a reflector (like aluminum foil) if needed to help spread the heat evenly.
🔁 Target Temperature: 99.5°F (37.5°C)
Use your thermometer to monitor frequently and adjust as needed.
3. Egg Stabilization
- Cut a section of an egg carton or use soft foam inside the bottle.
- This keeps eggs upright and prevents them from rolling, which is critical for healthy development.
4. Temperature and Humidity Monitoring
- Place the thermometer and hygrometer inside at egg level.
- Maintain humidity at:
- 45–55% during incubation
- 65–75% during the last 3 days (for hatching)
💧 To raise humidity:
Place a small bowl of water or a wet sponge inside the bottle.
5. Create Ventilation
- Drill or poke 4–6 small holes around the top or sides of the incubator.
- This allows fresh air to circulate, which is essential for the growing embryos.
6. Turn the Eggs
- Turn each egg 3 to 5 times per day by hand.
- This prevents the embryo from sticking to the shell and ensures even development.
- Stop turning eggs on day 18 to allow chicks to settle before hatching.
🛡️ Safety Tips
- Never leave the incubator unattended for long periods—monitor temperature closely.
- Place on a stable, non-flammable surface.
- Keep away from water, pets, and small children.
- If possible, use a backup power source (or keep eggs insulated during outages).
🐥 Final Thoughts
Building your own egg incubator is more than just a DIY project—it’s a hands-on lesson in biology, engineering, and patience. With consistent care, the right setup, and regular monitoring, your water-bottle incubator can successfully hatch healthy chicks.
So don’t throw out that empty bottle—give it new life by helping bring new life into the world. 🌱